Installation
Follow these steps to install divshot on your Windows system.
Step 1: Download
Download the latest version from our download page. Choose either the .exe installer.
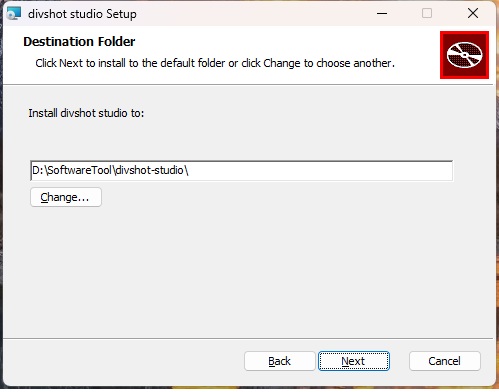
Step 2: Run Installer
Double-click the downloaded .exe file and follow the installation wizard. The default installation path is C:\Program Files\divshot.
Step 3: GPU Driver
Ensure you have the latest GPU drivers installed. divshot supports both cuda and vulkan backend which means you can run it on AMD GPUs or Intel GPUs that support vulkan.
Quick Start Guide
Get your first 3D reconstruction in minutes with this quick start guide.
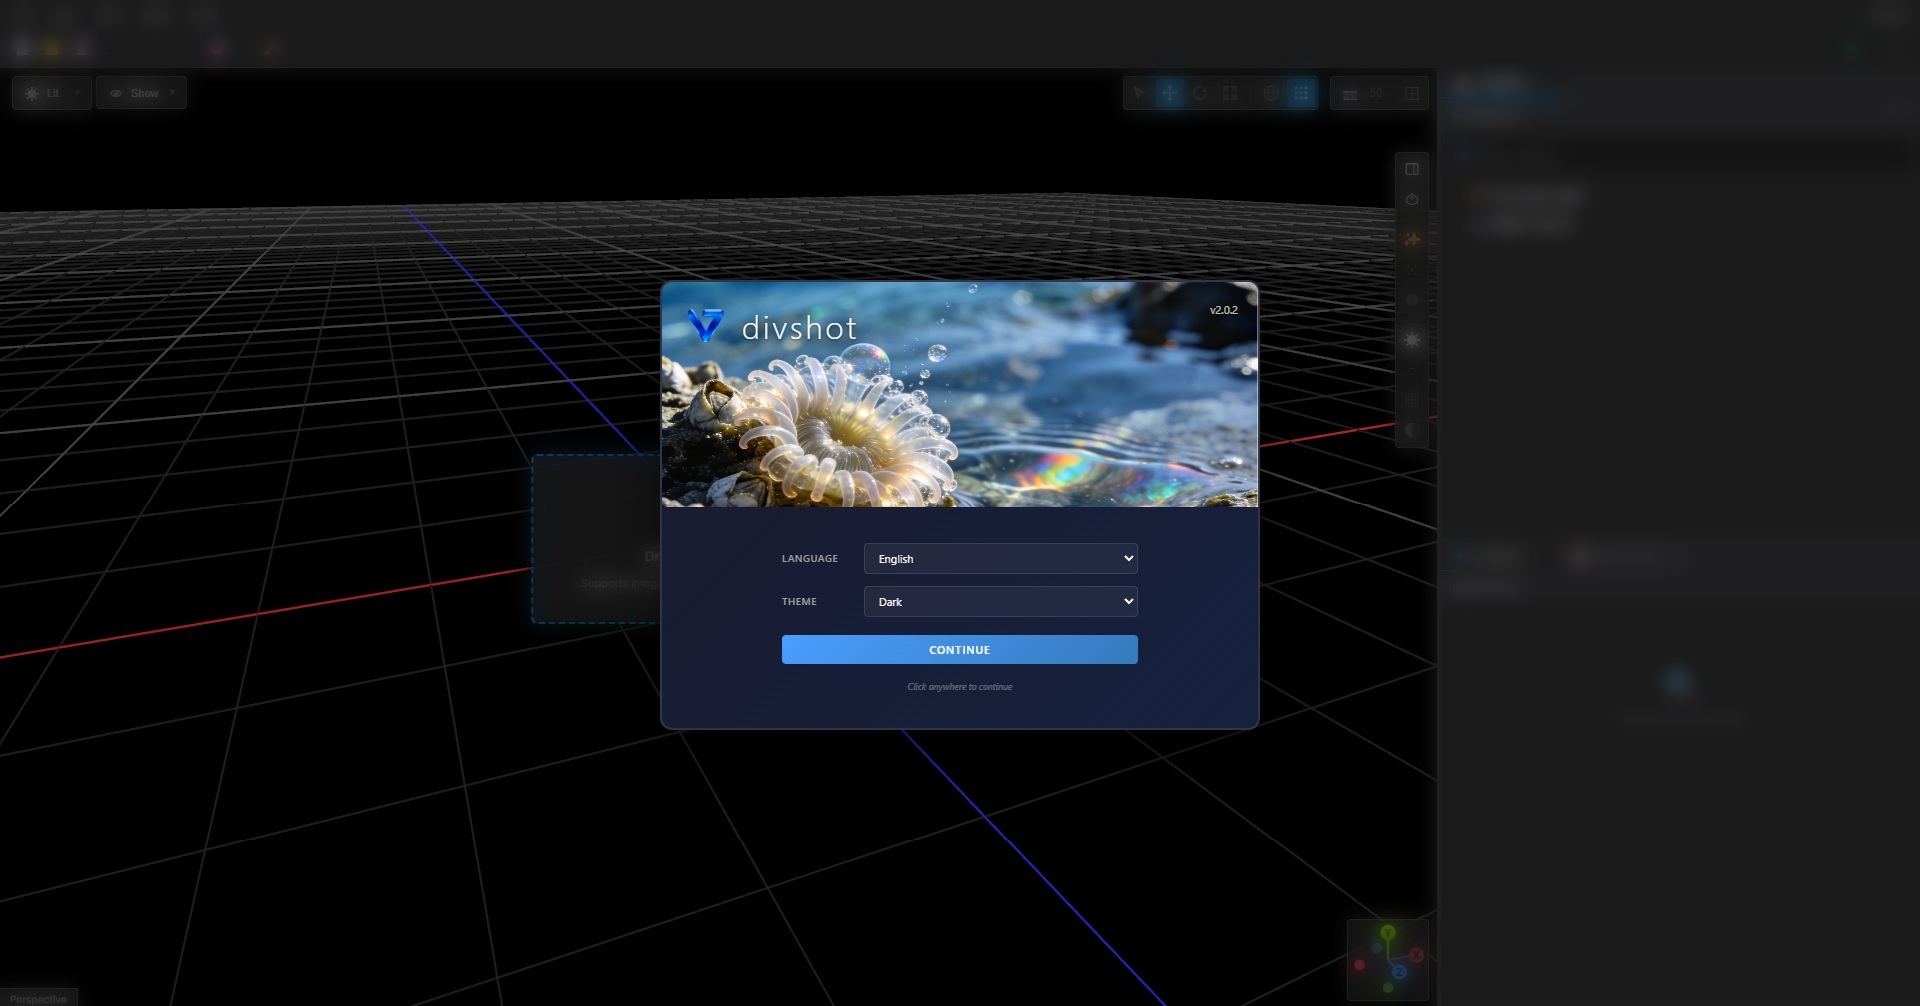
Launch divshot
Open divshot from the Start menu or desktop shortcut.
Import Images
Click "New Splats" File Menu Item or Drag and drop your images or video into the import area, or use File → Import.
Start Reconstruction
Click "Start Training" to begin the 3D Gaussian Splatting reconstruction process.
Preview & Export
Navigate the live preview and export your model when satisfied.
System Requirements
Minimum Requirements
| Operating System | Windows 10 64-bit |
| GPU | NVIDIA GTX 1060 or AMD RX 580 or Intel UHD Graphics 630 or higher |
| VRAM | 6 GB |
| RAM | 16 GB |
| Storage | 10 GB free space (SSD recommended) |
Recommended Requirements
| Operating System | Windows 11 64-bit |
| GPU | NVIDIA RTX 4000 series or higher |
| VRAM | 24 GB or more |
| RAM | 32 GB or more |
| Storage | NVMe SSD with 100+ GB free space |
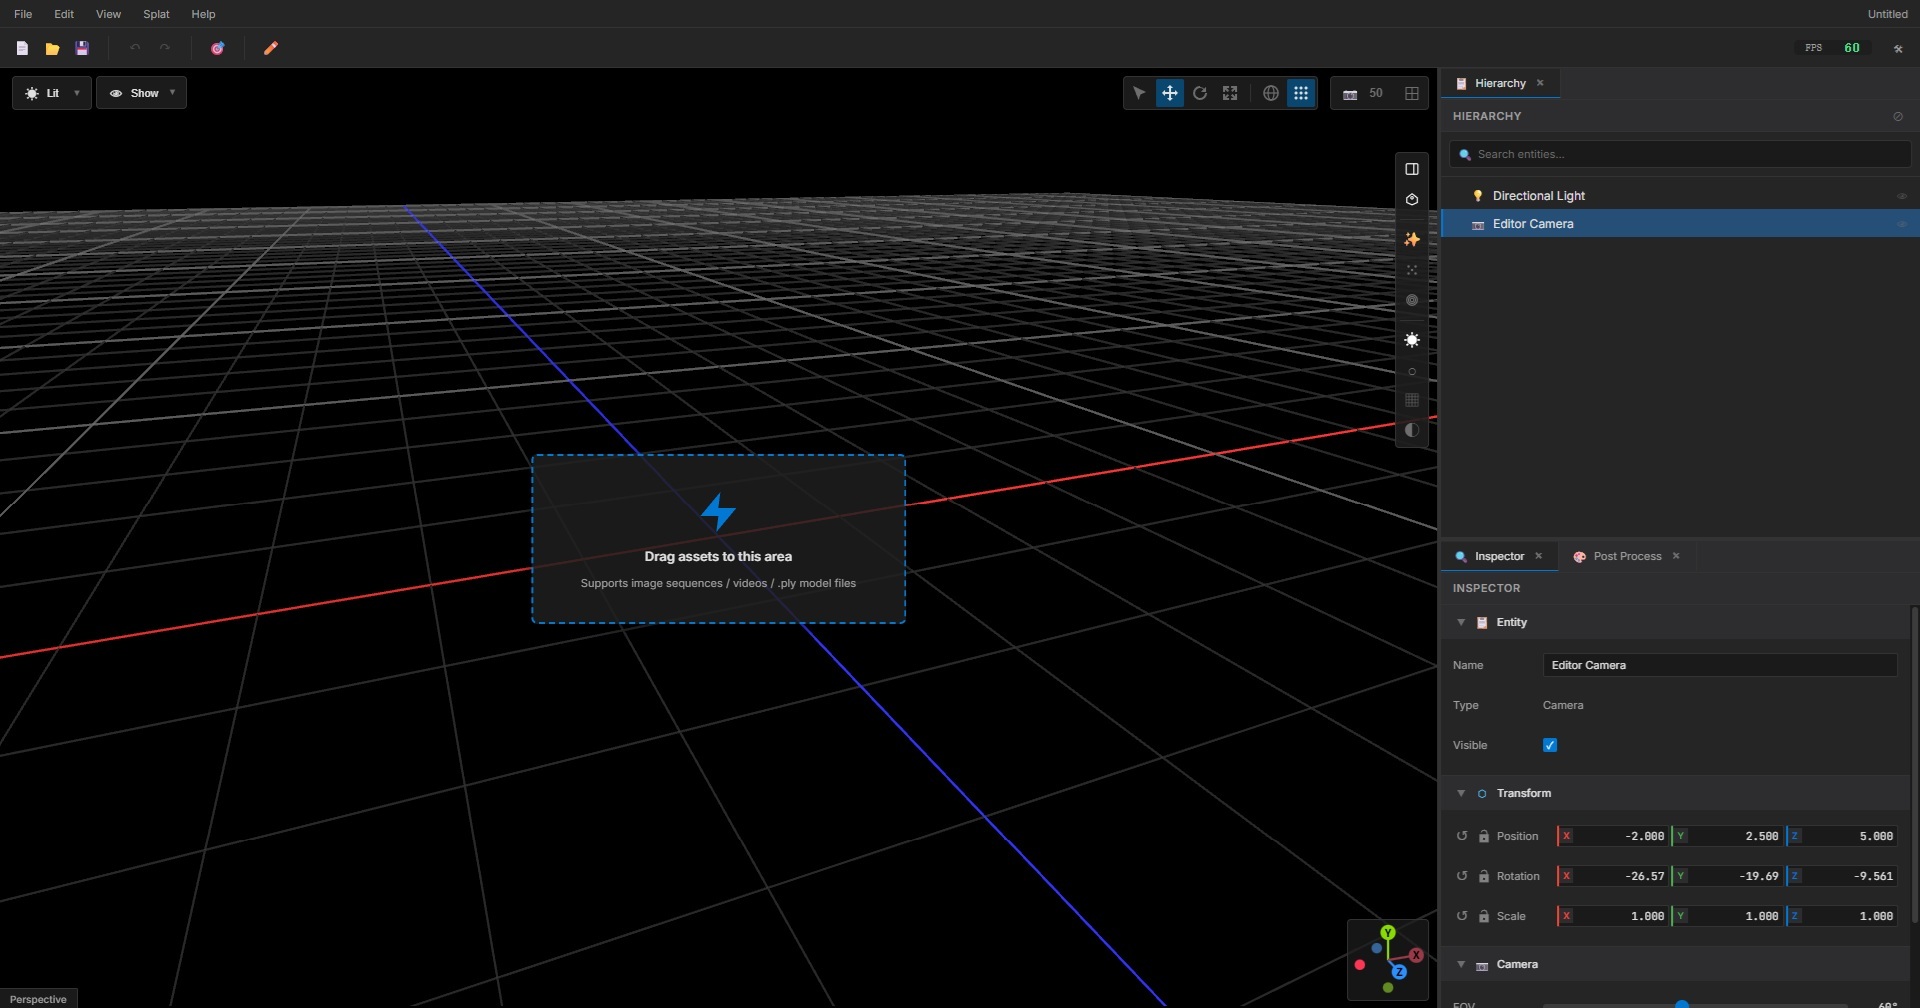
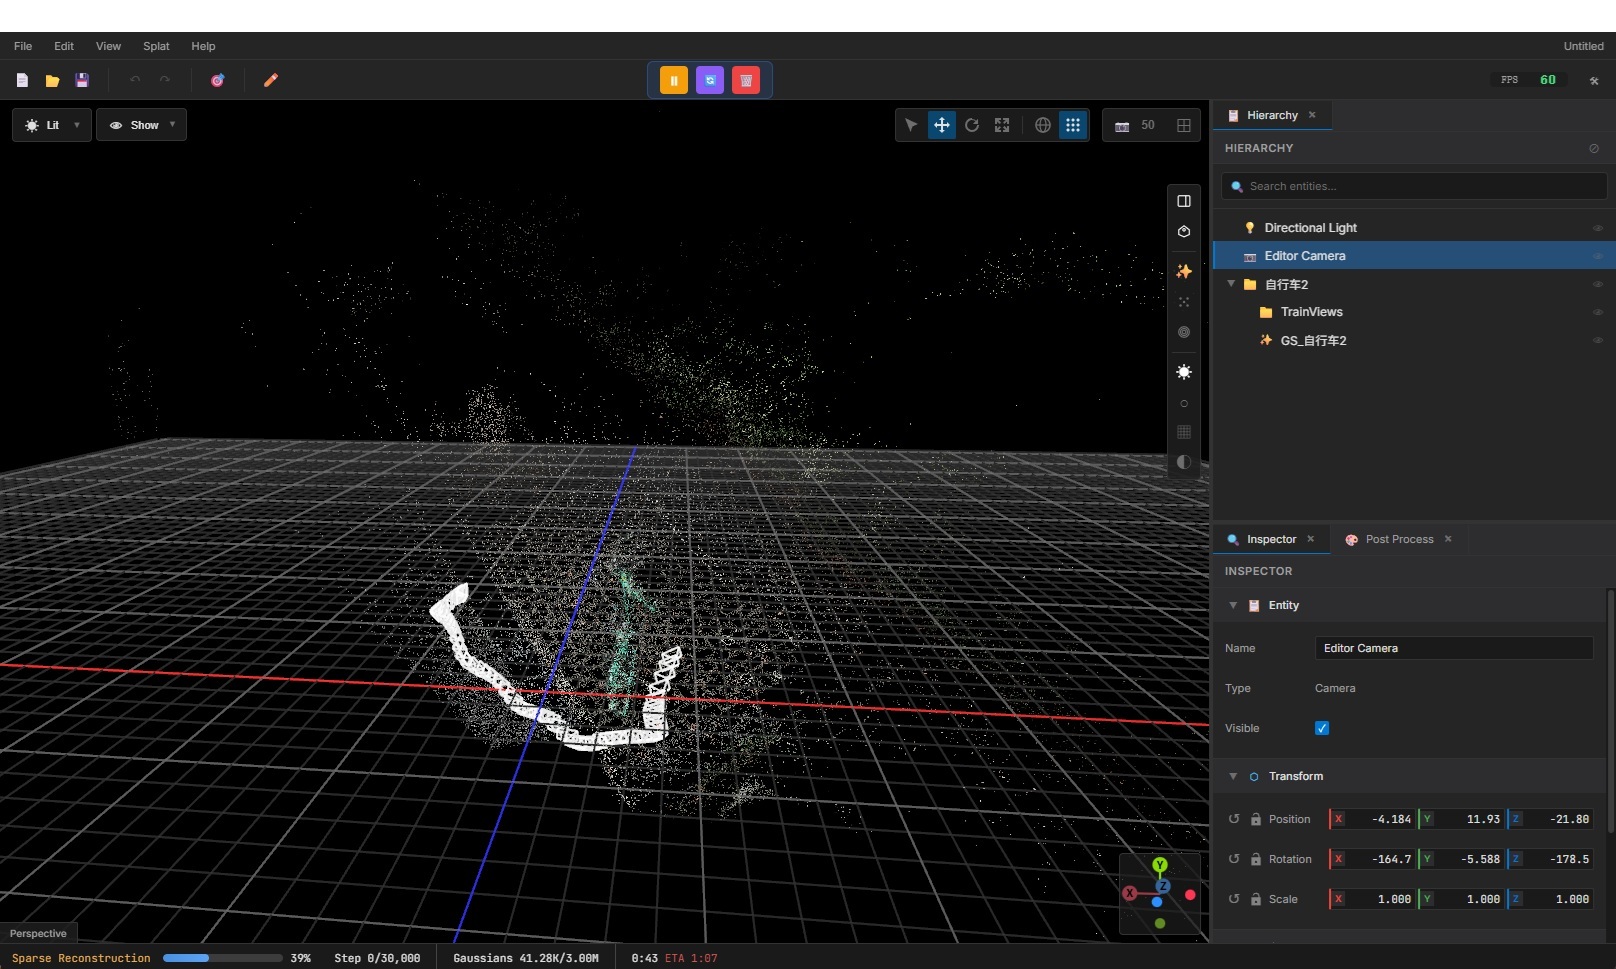
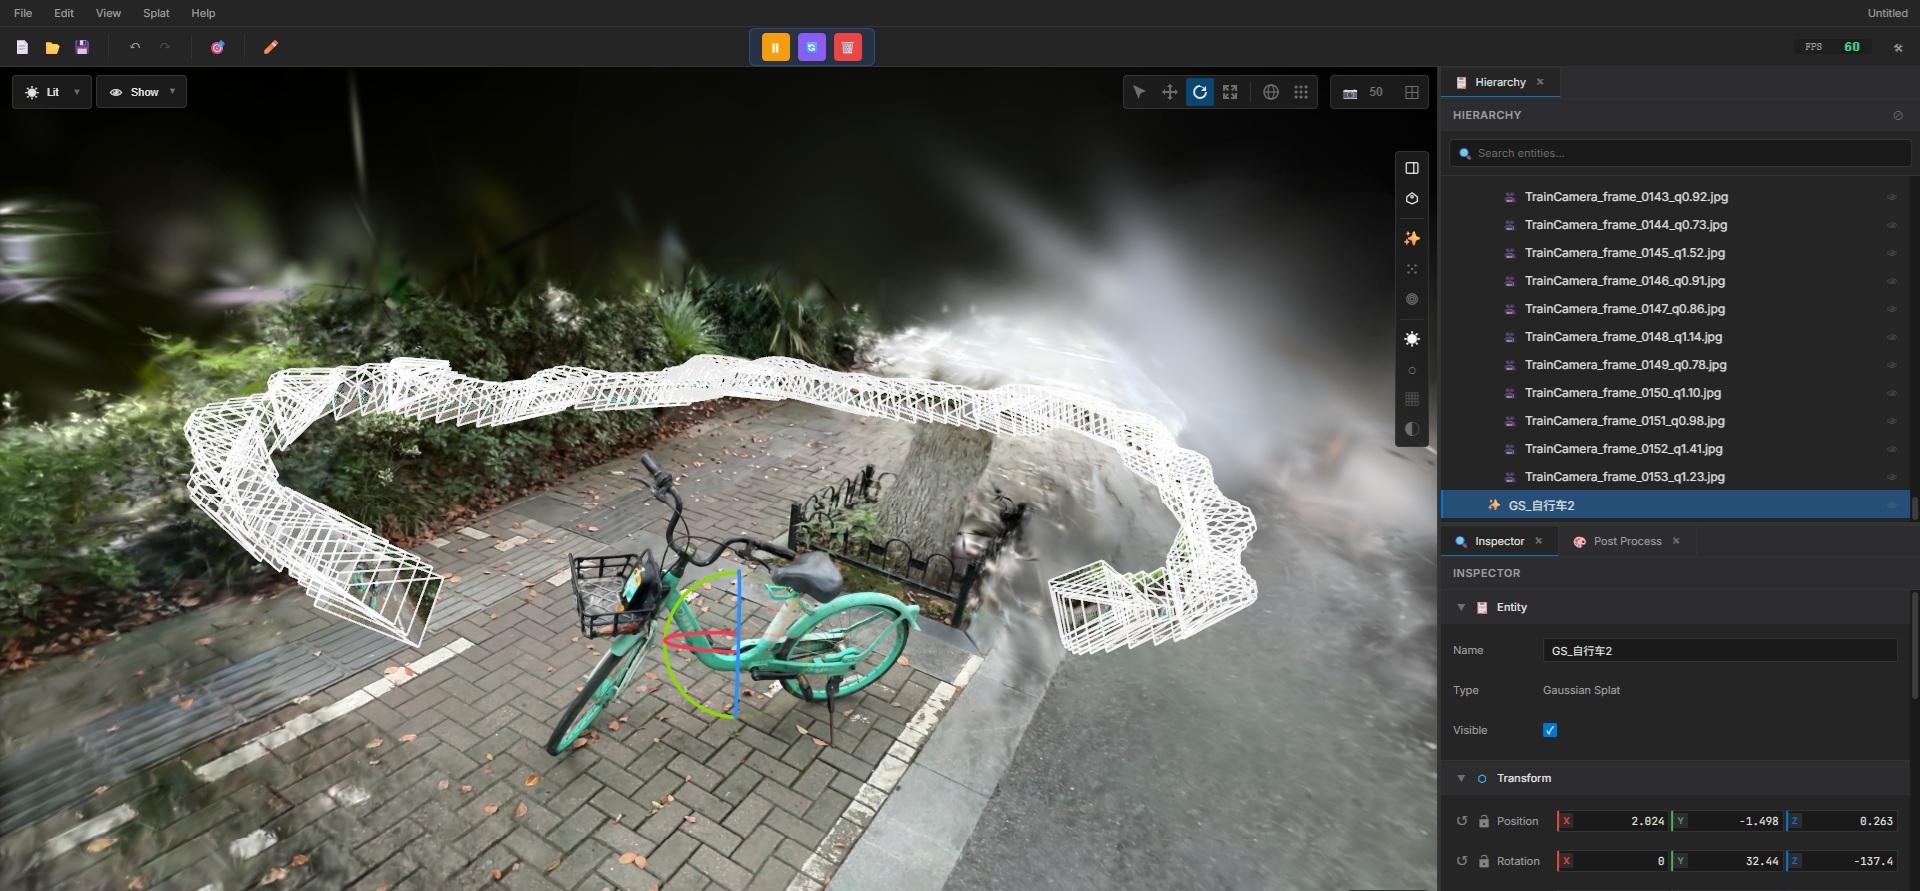
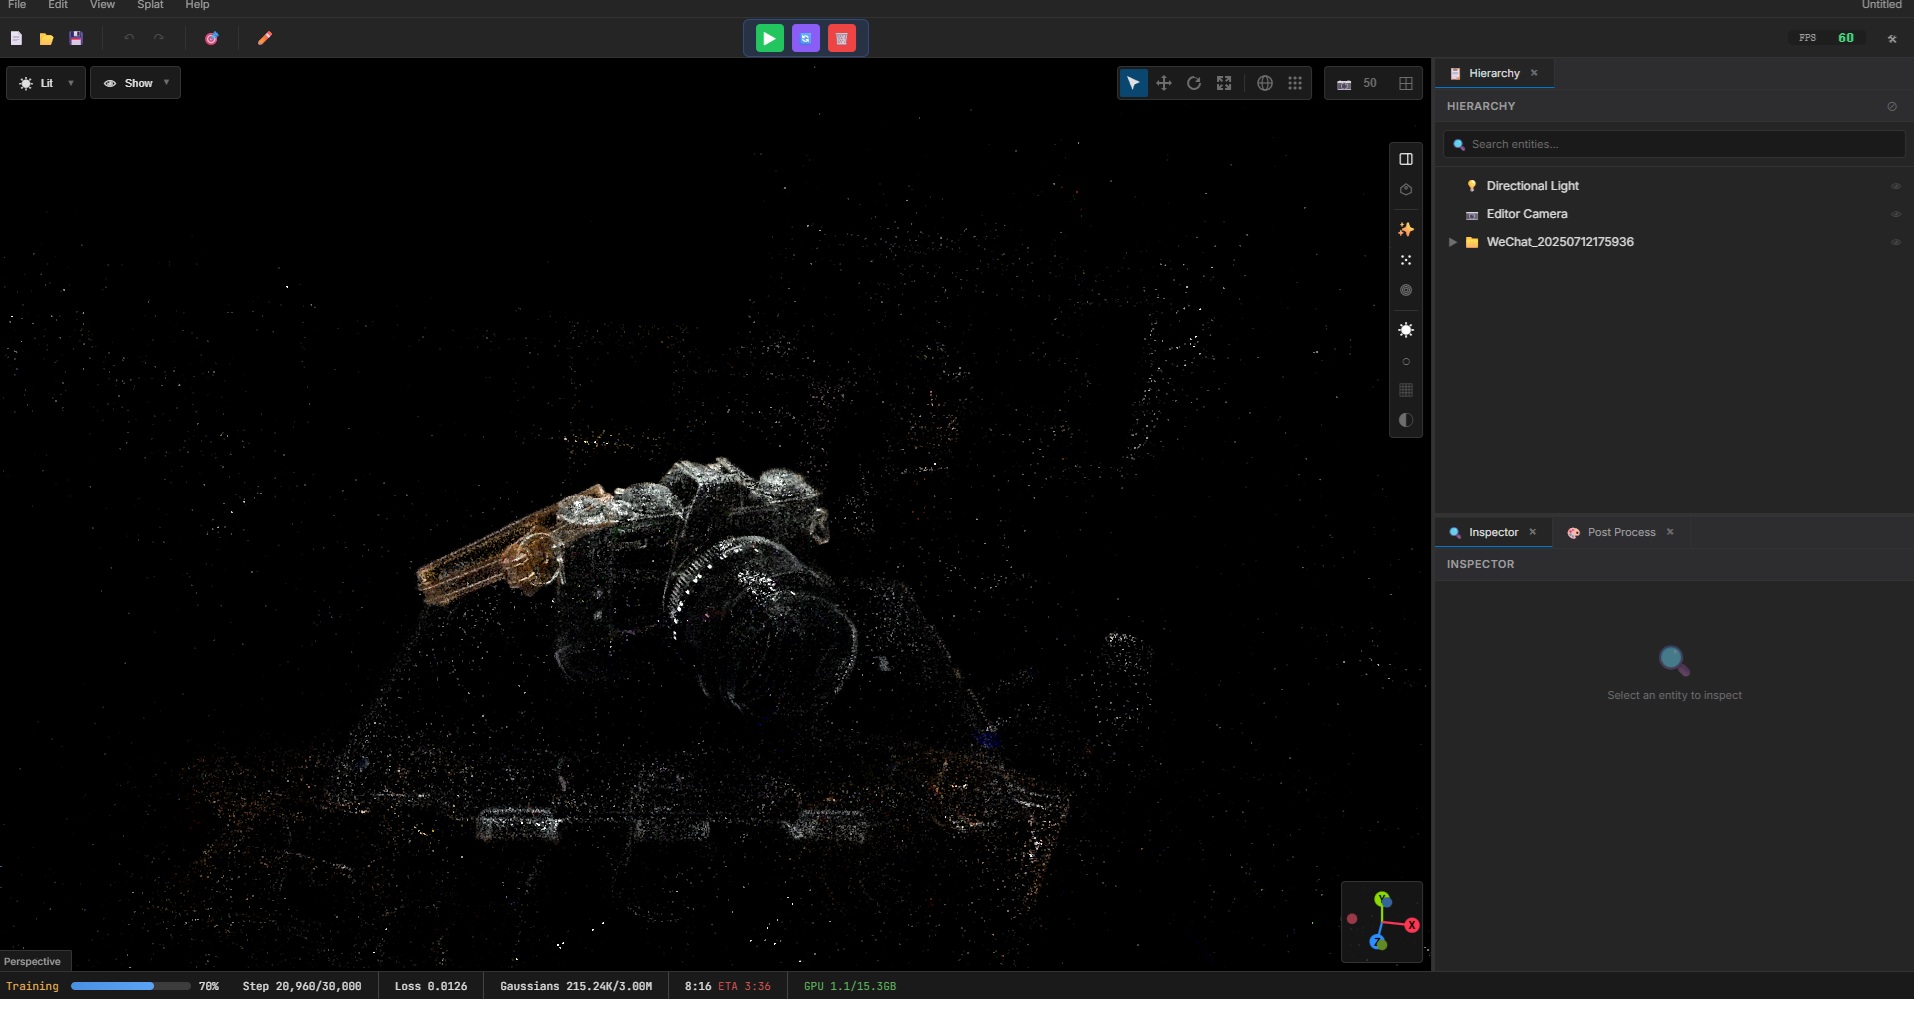
User Interface
divshot features an intuitive interface designed for efficient 3D reconstruction workflows. Understanding the UI layout will help you navigate and use the application effectively.
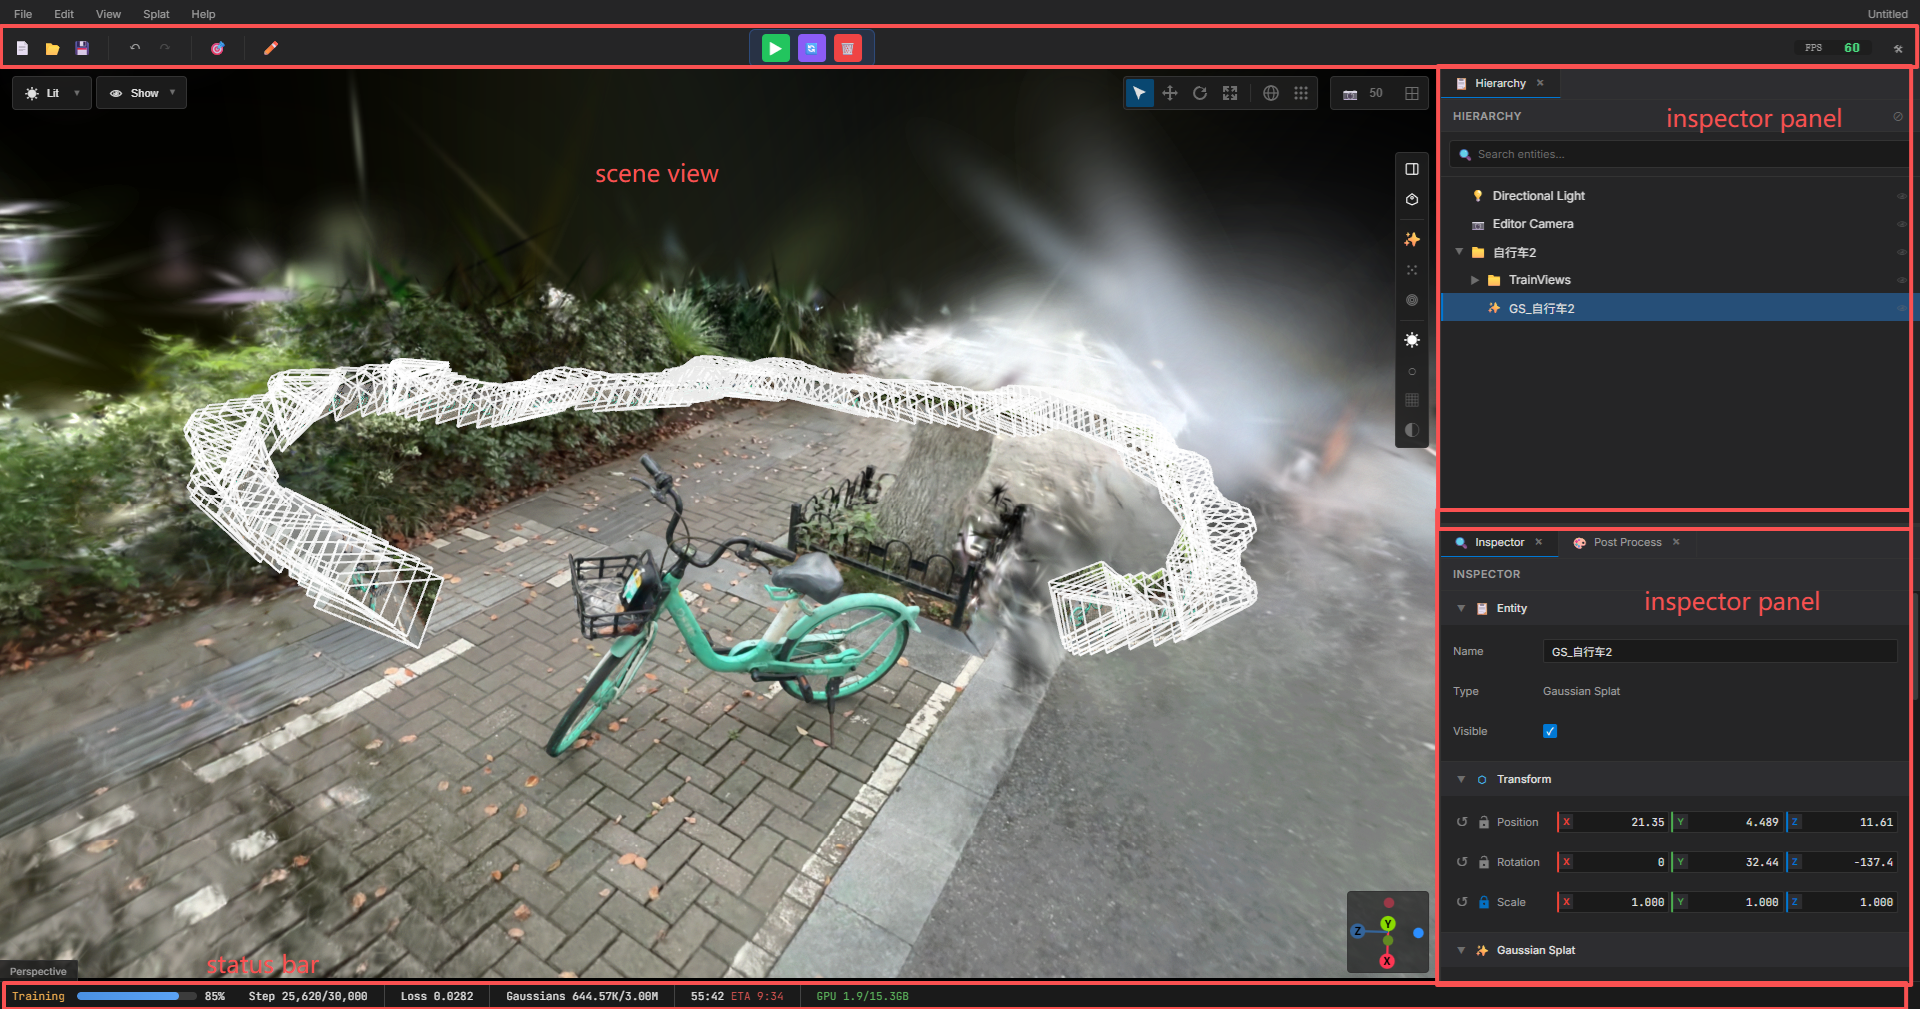
Interface Overview
The divshot interface consists of several key areas:
- Menu Bar: Access to file operations, edit functions, and application settings
- Toolbar: Quick access buttons for common functions
- 3D Viewport: Central area displaying the 3D scene preview
- Scene Hierarchy Panel: Right-side panel showing scene structure and objects
- Inspector Panel: Right-side panel for viewing and editing selected object properties
- Status Bar: Bottom bar displaying training progress and system information
Toolbar
The toolbar provides quick access to frequently used functions. Here are the main toolbar buttons:

| Button | Function |
|---|---|
| New Scene | New scene project |
| Open | Open an existing project file |
| Save | Save the current project |
| Undo | Undo last action |
| Redo | Redo last action |
| Focus object | Set camera to focus on the selected object |
| Splat Edit | Enable splat editing mode and show splat editing tools |
| Start/Pause/Resume Training | Begin/Pause/Resume the 3D Gaussian Splatting training process |
| Reset Training | Reset the current training session and prepare for new training |
Status Bar
The status bar at the bottom of the window provides real-time information about the current training session and system status.

The status bar displays the following information:
- Training Progress: Current iteration number and total iterations (e.g., "Iteration 15,000 / 30,000")
- Training Status: Current phase (SfM, Training, Complete, etc.)
- VRAM Usage: GPU memory usage percentage and available memory
- Training Metrics: Loss values, PSNR, and other quality metrics
- Processing Time: Elapsed time for current training session
- System Status: GPU backend (CUDA/Vulkan) and device information
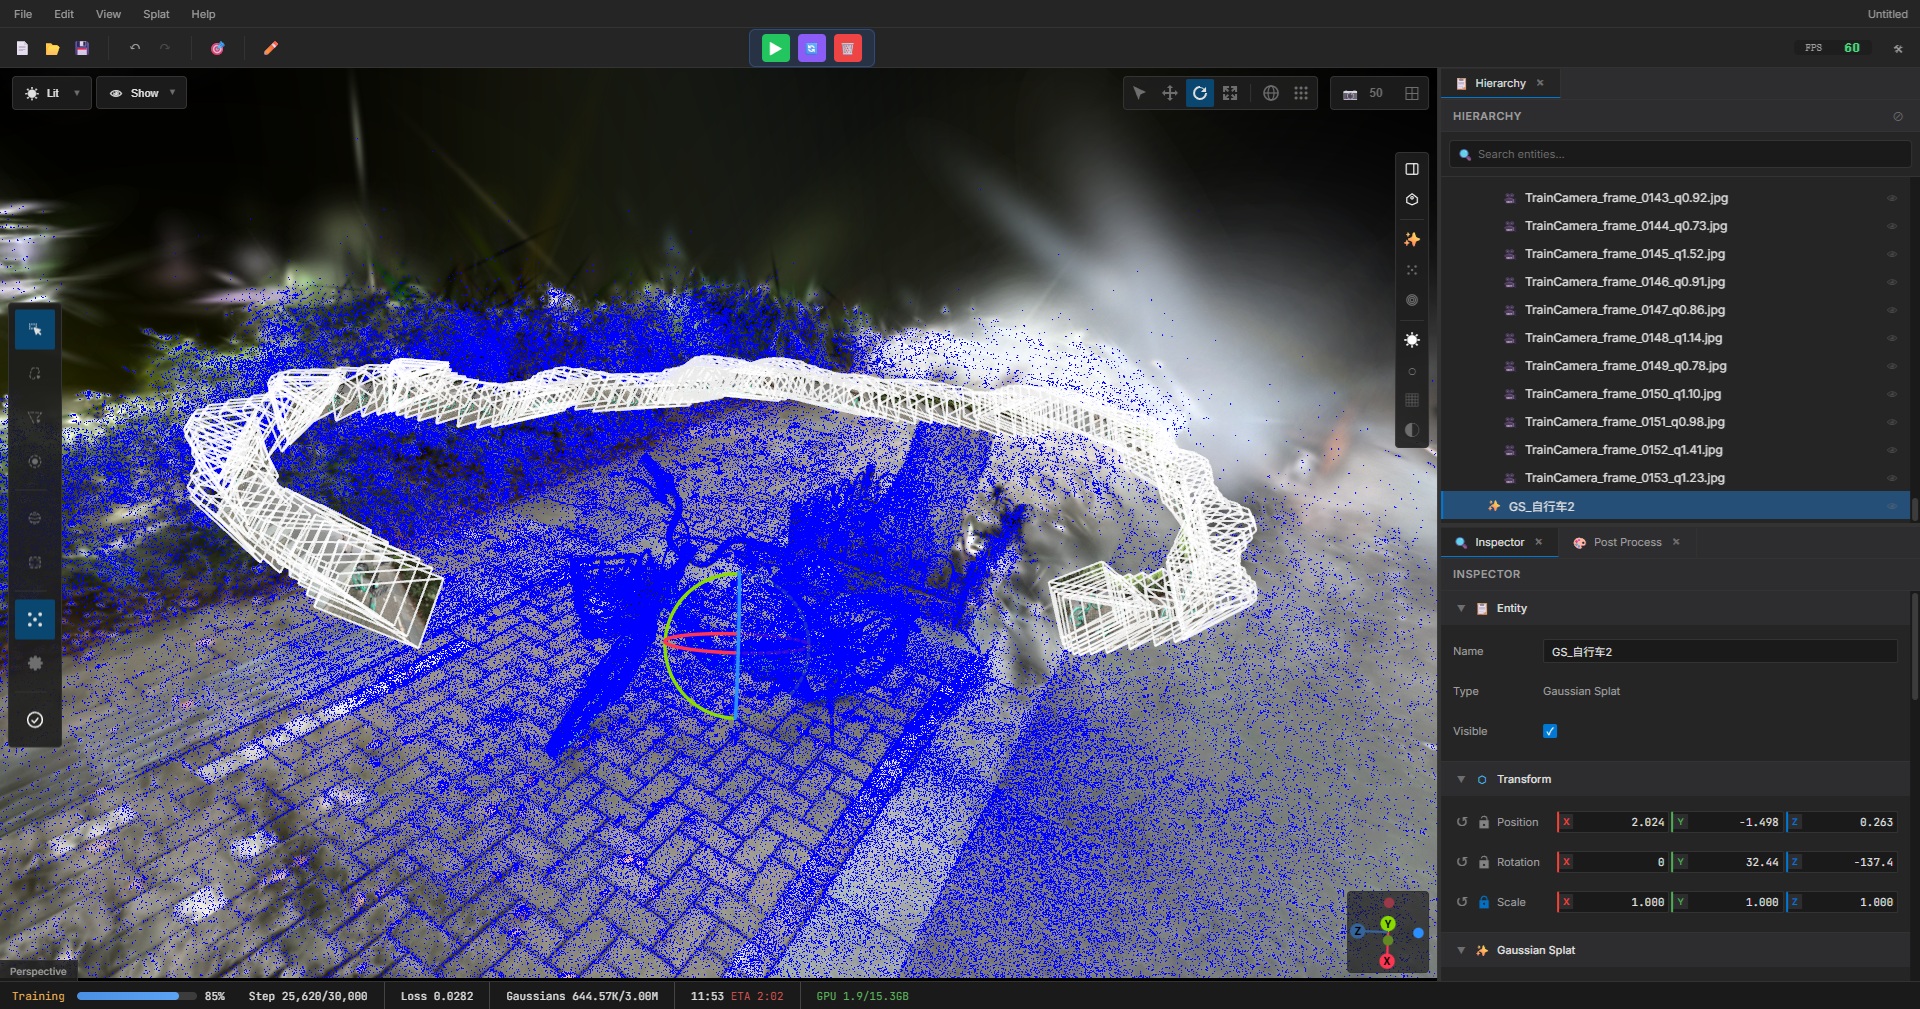
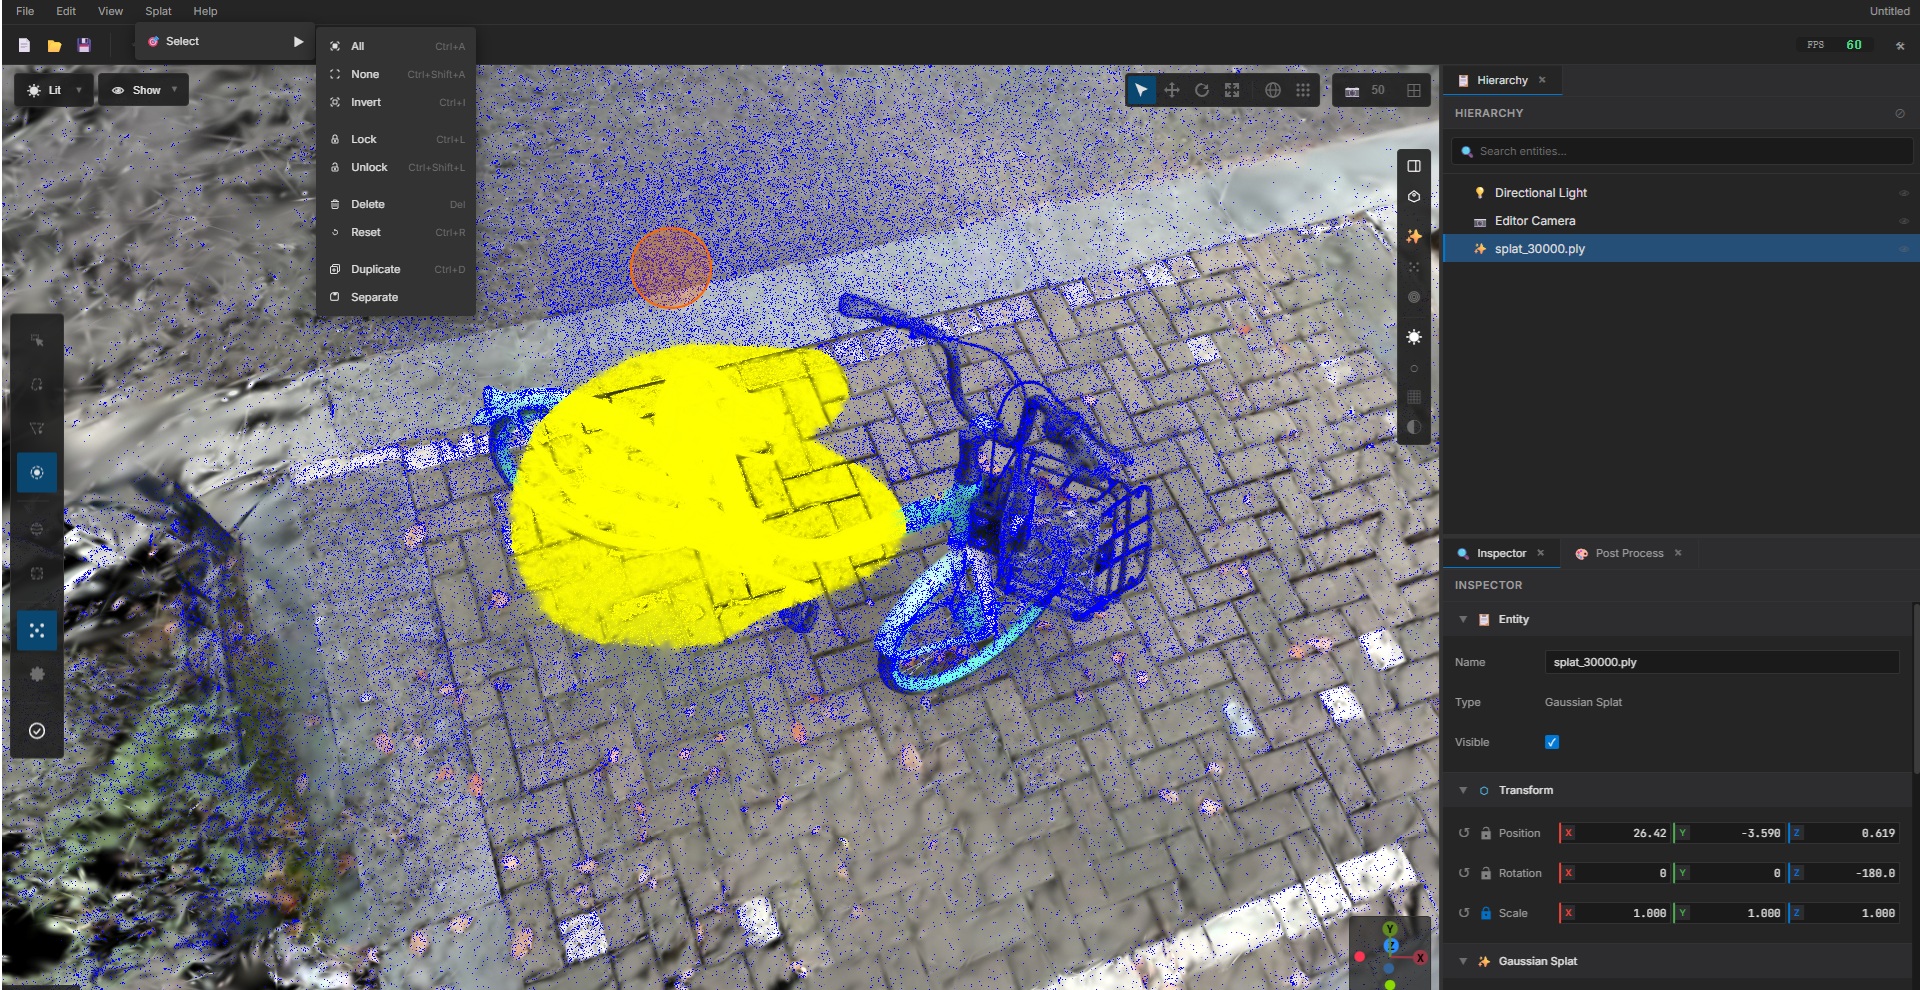
Scene Hierarchy Panel
The Scene Hierarchy panel on the right side of the interface displays the structure of your 3D scene. This panel allows you to:
- View all objects and components in the scene
- Select objects by clicking on them in the hierarchy
- Organize scene elements in a tree structure
- Access object properties and settings
- Enable or disable visibility of specific elements
Common elements shown in the hierarchy include:
- Camera positions and poses
- Gaussian splat groups
- Scene objects and meshes
- Light sources and environment settings
Inspector Panel
The Inspector panel, also located on the right side, displays detailed properties and settings for the currently selected object or scene element. The Inspector panel allows you to:
- View and edit object properties (position, rotation, scale)
- Adjust training parameters for selected splats
- Modify material and rendering settings
- Configure camera settings and views
- Access advanced options and parameters
When no object is selected, the Inspector panel shows general scene settings and global parameters.
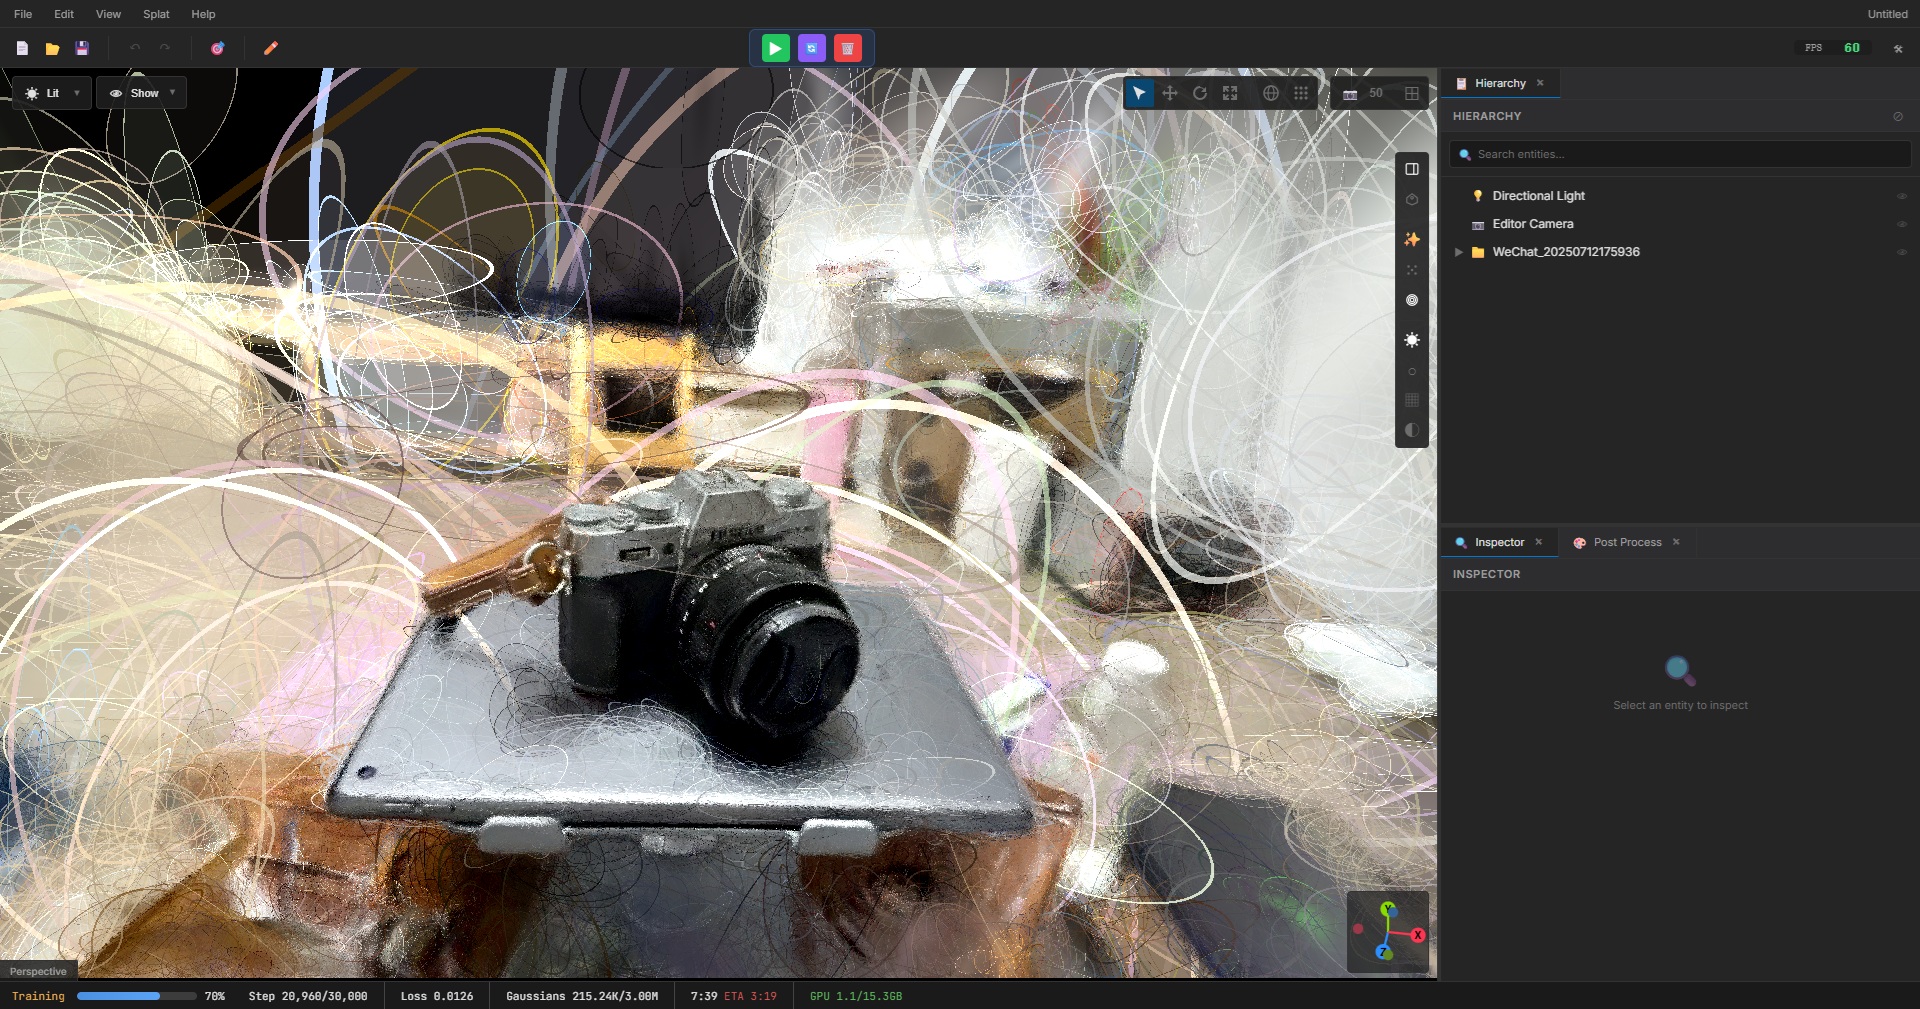
3D Viewport
The central 3D viewport is where you interact with and preview your 3D scene. The viewport provides:
- Real-time preview of the reconstruction during training
- Interactive navigation and camera controls
- Visual feedback for selection and editing operations
- Display of training progress and quality improvements
Use the viewport controls to navigate around your scene, inspect reconstruction quality, and verify camera poses. The viewport updates in real-time as training progresses, allowing you to monitor the reconstruction quality throughout the process.
Importing Images
divshot supports various image and video formats for 3D reconstruction. You can import images individually or as a batch, and also import videos which will be automatically processed into frames.
Supported Input Formats
- Images: JPG, PNG
- Videos: MP4, MOV, MKV, AVI
Importing Videos
When importing videos, divshot automatically extracts frames for reconstruction. You can adjust frame extraction settings to balance quality and processing time.
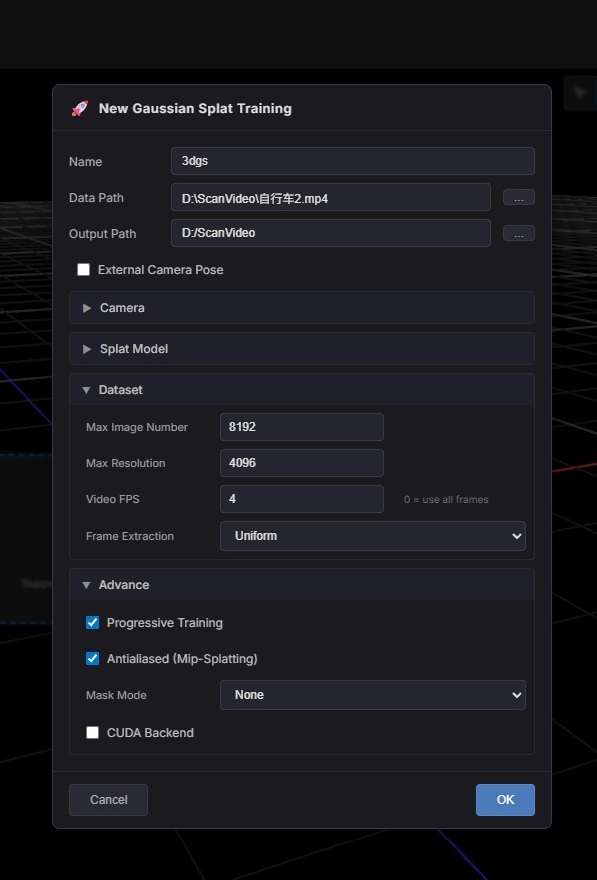
Image Capture Tips
- Capture images with 60-80% overlap between consecutive shots
- Maintain consistent lighting conditions
- Avoid motion blur and out-of-focus images
- Cover the subject from multiple angles (360° if possible)
- For best results, use 100-500 images depending on scene complexity
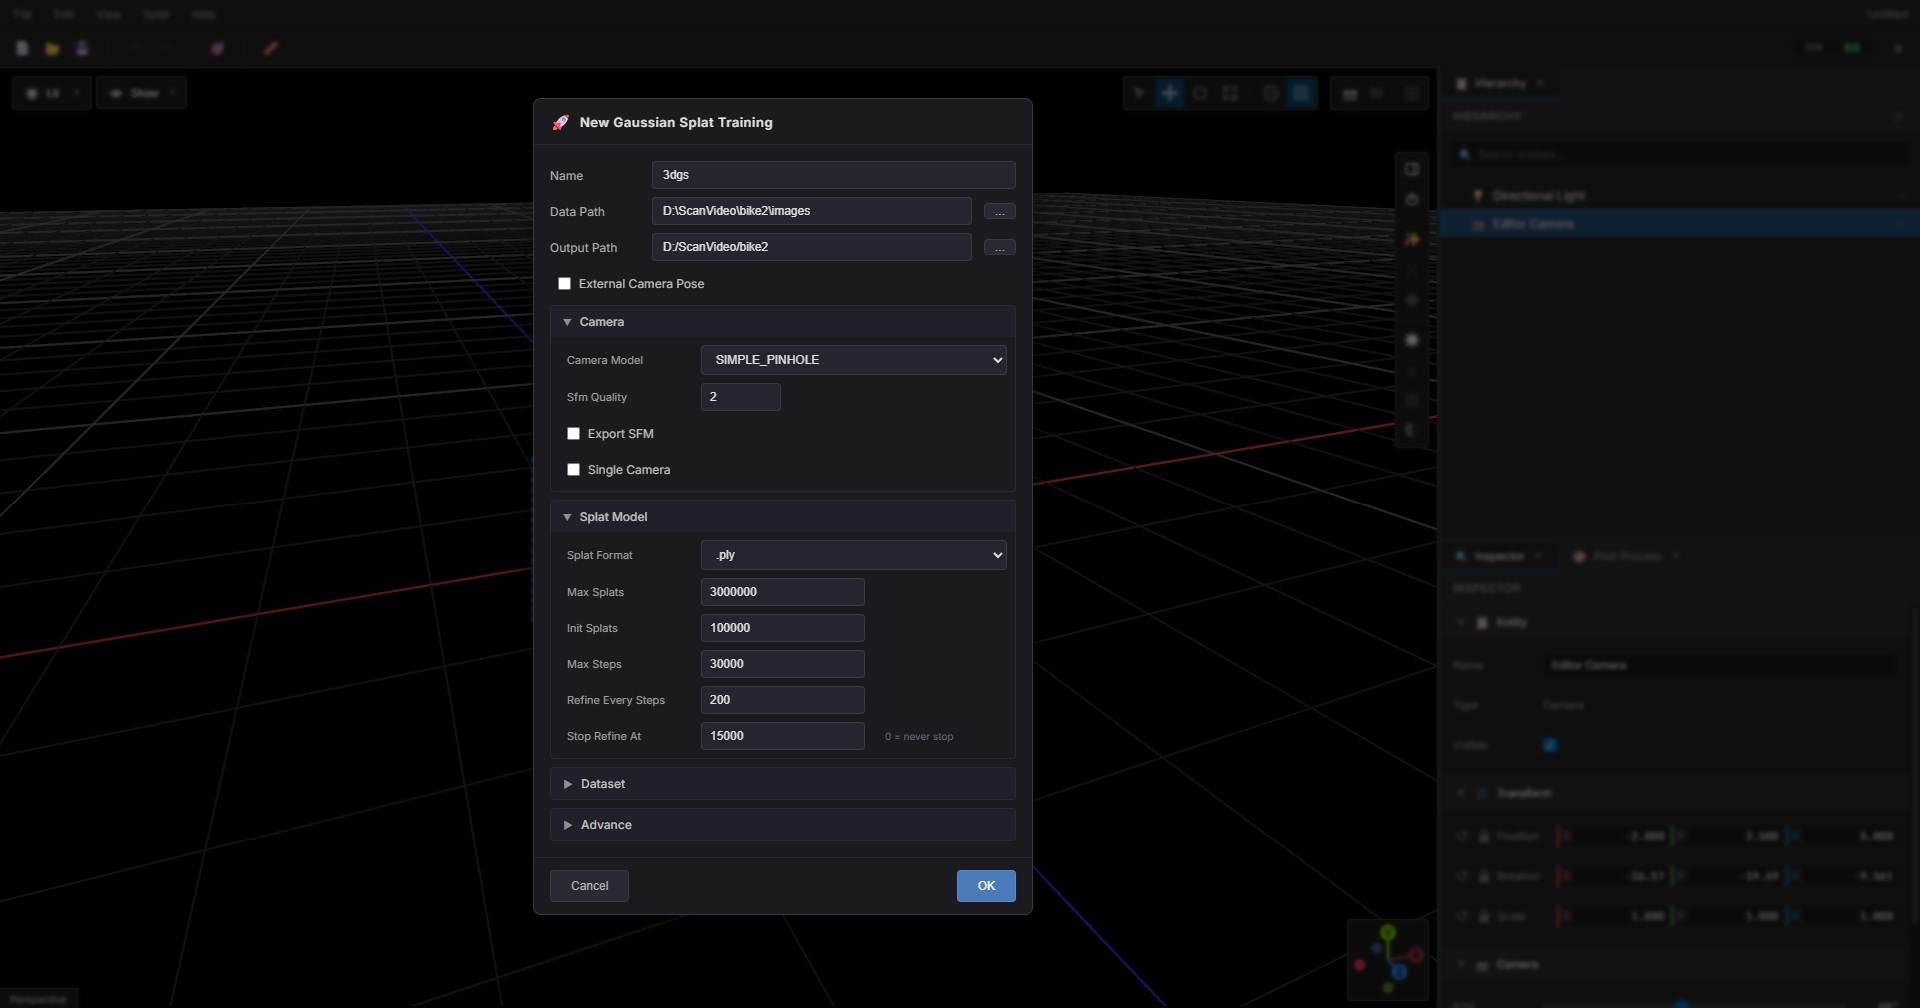
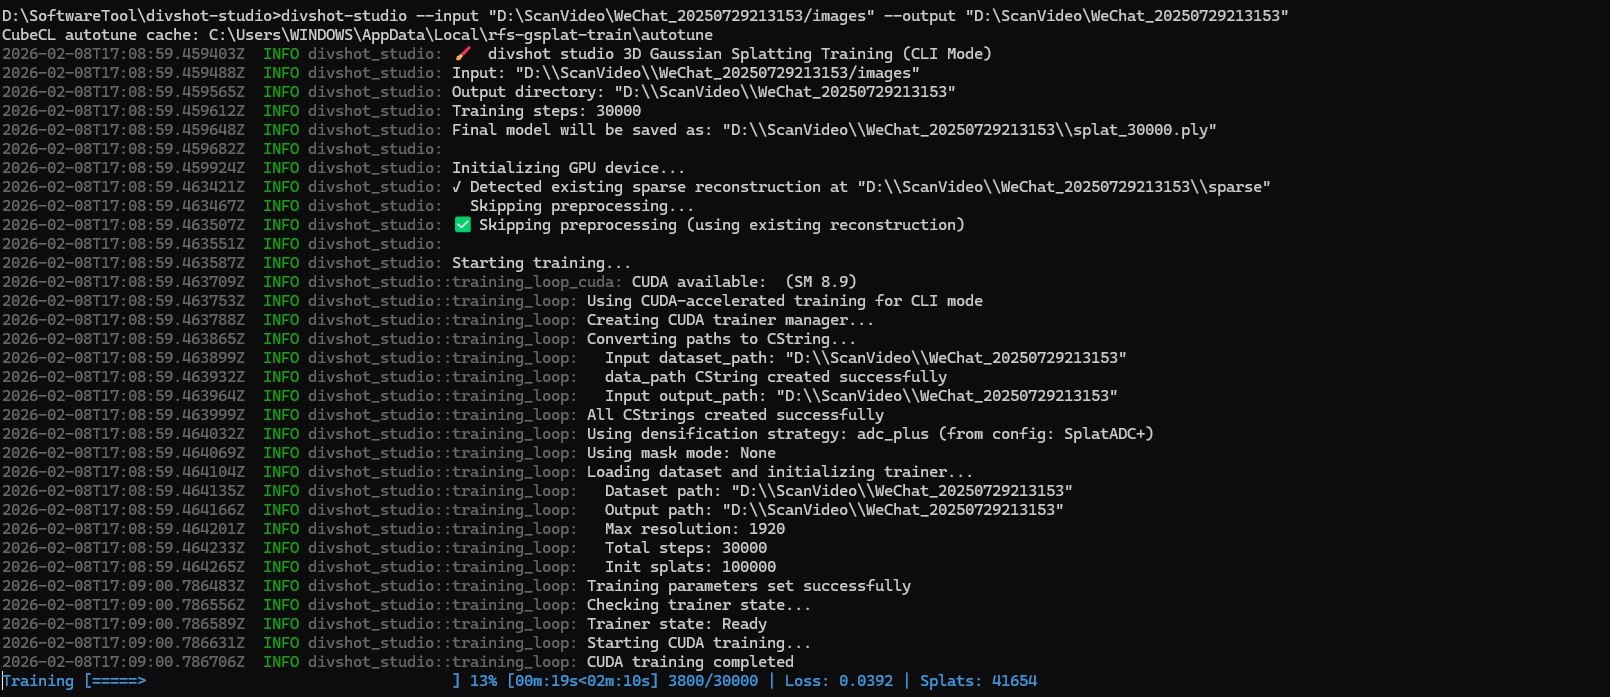
Running Reconstruction
The reconstruction process consists of two main phases: camera pose estimation and Gaussian splatting training.
Camera Pose Estimation
divshot uses Structure from Motion (SfM) to determine camera positions. This process is automatic and typically takes a few minutes. The SfM process analyzes feature points across your images to reconstruct camera poses and a sparse point cloud.
Gaussian Splatting Training
The 3DGS training iteratively optimizes Gaussian primitives to match your input images. Training progress is visible in real-time through the preview window. You can monitor training metrics and adjust parameters as needed.
Training Parameters
- Iterations: Default 30,000 (increase for more detail)
- Learning Rate: Automatic adjustment recommended
- Densification: Controls Gaussian point density
Preview & Navigation
Navigate your 3D scene in real-time during and after training. The preview window updates continuously as training progresses, allowing you to monitor reconstruction quality.
Navigation Controls
| Right Mouse + Drag | Rotate camera around scene |
| Middle Mouse + Drag | Pan camera |
| Scroll Wheel | Zoom in/out |
| WASDQE Keys | Fly-through navigation |
| Shift | Increase movement speed |
Rendering Mode Toggle
divshot provides different rendering modes to visualize your Gaussian splats in various ways. You can switch between rendering modes using the tool buttons on the right side of the scene view.
Splat Mode
The default rendering mode displays Gaussian splats as smooth, blended surfaces. This mode provides the most realistic visualization of your reconstruction and is ideal for previewing the final result.

Point Mode
Point mode displays each Gaussian splat as a single point, showing the underlying structure and distribution of splats. This mode is useful for inspecting splat density and identifying areas that may need more splats or editing.
Rings Mode
Rings mode visualizes Gaussian splats as circular rings, displaying their size and orientation. This mode helps you understand the scale and distribution of splats in your scene, making it easier to identify outliers or areas with inconsistent splat sizes.
Splats Editing
Edit and refine your Gaussian splats to improve reconstruction quality and remove unwanted elements.
Editing Tools
divshot provides various editing tools to manipulate Gaussian splats:
- Selection: Select individual or groups of splats for editing
- Delete: Remove unwanted splats from the scene
- Transform: Move, rotate, or scale selected splats
Selection Tools
divshot provides 6 different splat selection tools, allowing you to choose the most appropriate selection method based on your needs:
- Rectangle Selection (Rect): Drag to create a rectangular selection area, selecting all splats within the rectangle.
- Lasso Selection (Lasso): Draw a freeform curve to create an arbitrary shape selection, ideal for irregular areas.
- Polygon Selection (Polygon): Click points to form a closed polygon, useful for regular or semi-regular selections.
- Brush Selection (Brush): Paint over areas like a brush to select splats, suitable for detailed and precise selections.
- Sphere Selection (Sphere): Select splats within a spherical volume in 3D space, convenient for overlapping spatial selections.
- Box Selection (Box): Similar to sphere selection but with a cubic volume, ideal for batch selection of regular volumes.
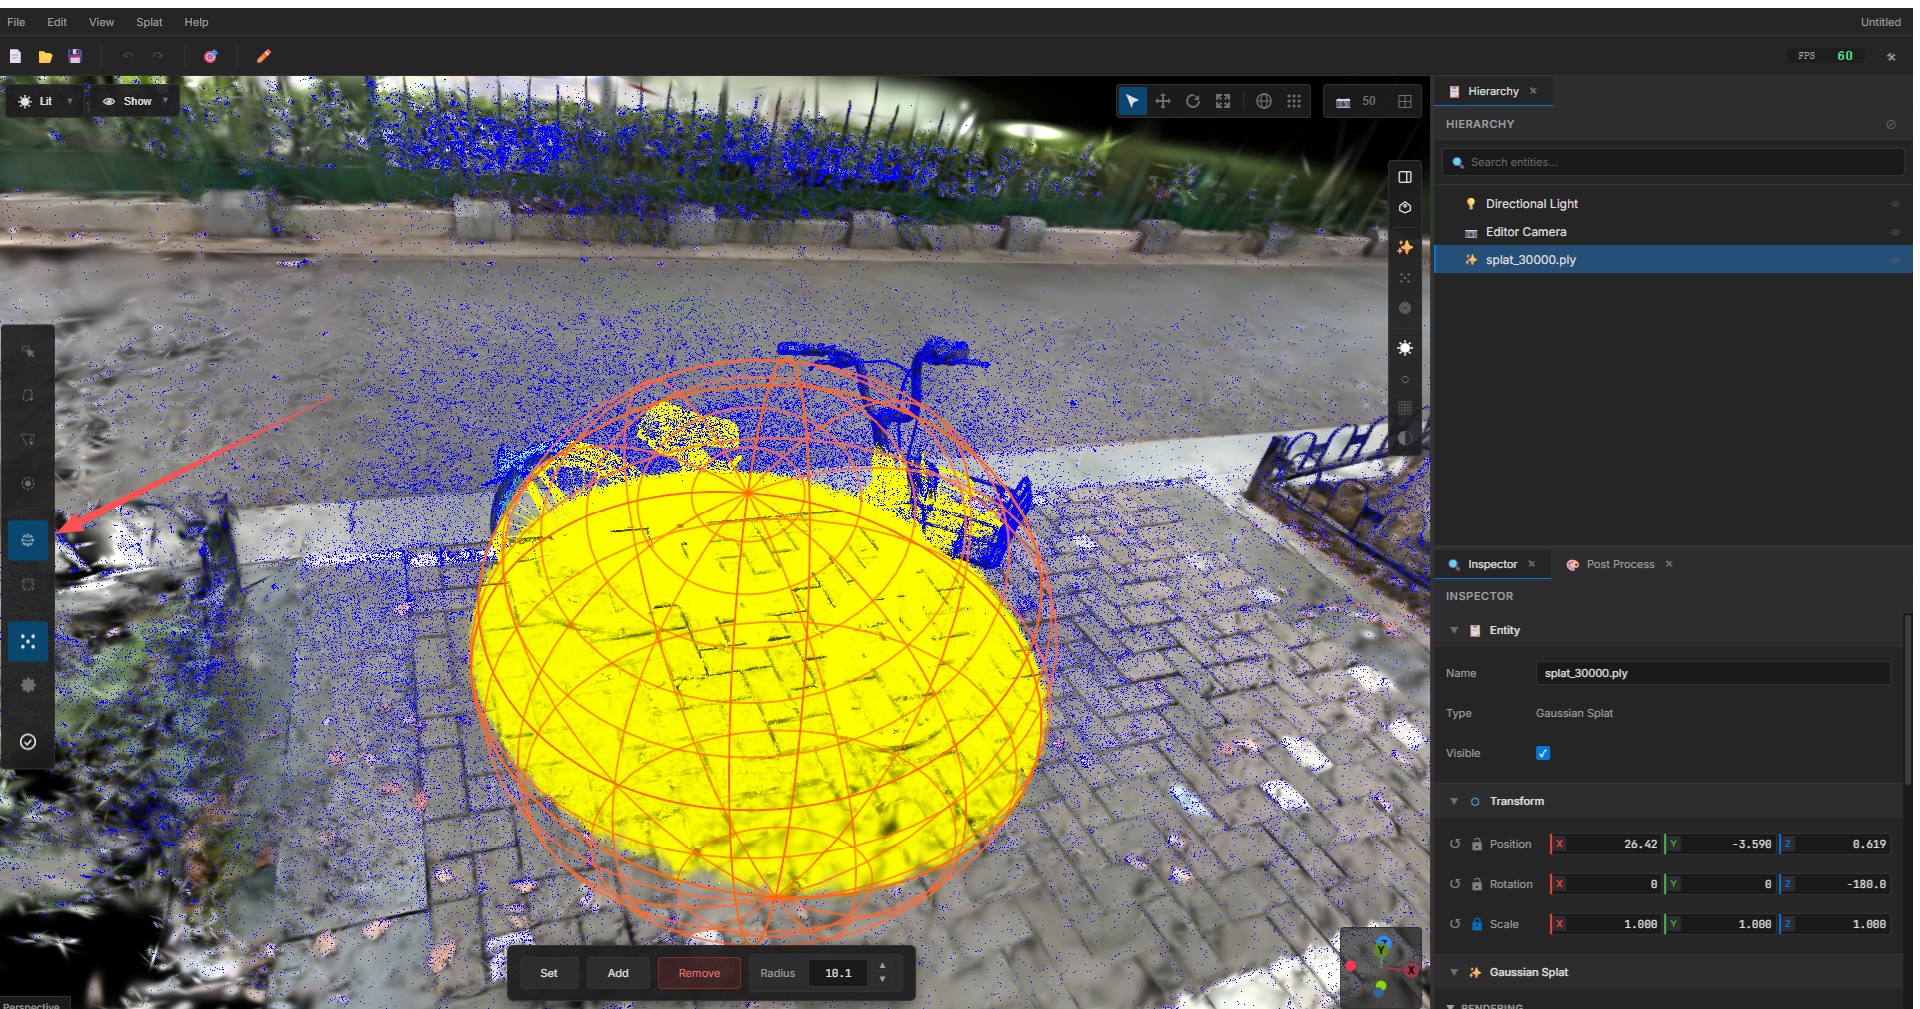
Editing Selected Splats
Once you have selected a region of splats or specific splats using any of the selection tools, you can perform various editing operations through the Splats menu submenu items. These operations allow you to refine your reconstruction by removing unwanted parts and keeping only the desired elements, resulting in a clean object.
Splats Menu Operations
The Splats menu provides the following editing operations:
- Invert Selection: Reverse the current selection to select all previously unselected splats. Useful when you want to keep a small region and remove everything else.
- Delete Selected: Remove all selected splats from the scene. This is the primary method for cleaning up unwanted parts of your reconstruction.
- Clear Selection: Deselect all currently selected splats.
Keyboard Shortcuts
For faster workflow, you can use keyboard shortcuts for common operations:
| Ctrl+I (or Cmd+I on Mac) | Invert selection |
| Delete or Backspace | Delete selected splats |
| Esc | Clear selection |
Workflow: Cleaning Your Reconstruction
Follow these steps to clean up your reconstruction:
- Use any selection tool to select unwanted splats or regions
- If needed, use Invert Selection to select everything except the region you want to keep
- Delete the selected splats using the Delete command or keyboard shortcut
- Repeat the selection and deletion process as needed to remove all unwanted parts
- Once editing is complete, click the Apply tool button to finalize your changes
- Export the edited model using File → Export to save your cleaned reconstruction
Best Practices
- Use selection tools to isolate problematic areas before editing
- Delete outlier splats that don't match the scene geometry
- Adjust density in areas with reconstruction artifacts
- Save your work frequently when making extensive edits
Exporting Models
Export your reconstructed scenes in various formats for use in other applications. Access the export dialog through File → Export or use the export button in the toolbar.
Exporting 3DGS Models
Export models in 3D Gaussian Splatting formats:
- PLY: Native Gaussian Splatting format with full quality (
.ply) - SPZ: Scanniverse scene format (
.spz; quantized) - Splats: Compressed Gaussian Splatting format (
.splat; quantized, omits higher-order SH colors) - SOG: Losslessly compressed Gaussian Splatting format (
.sog)
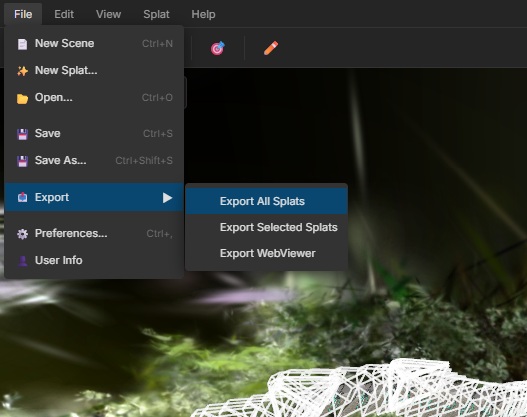
Export Options
- Choose output directory and filename
- Select format based on your use case
- For web deployment, use compressed formats like SPZ or SOG
- For maximum quality, use PLY format
Exporting Mesh (Future Feature)
Future versions will support converting 3DGS models to traditional mesh formats:
- GLTF/GLB: Standard 3D format for web and game engines
- OBJ: Universal mesh format with textures
- FBX: Autodesk format for 3D software integration
Image Masking
Use masks to exclude unwanted objects or backgrounds from reconstruction.
Creating Masks
Masks are grayscale images where white areas are included and black areas are excluded from reconstruction.
Memory Management
Optimize VRAM usage for large-scale reconstructions. The status bar provides real-time VRAM monitoring to help you manage memory effectively.
Memory Optimization Tips
- Enable tiled rendering for scenes exceeding VRAM capacity
- Reduce training resolution for initial tests
- Close other GPU-intensive applications during training
- Process videos with lower frame extraction rates to reduce memory usage
- Use compressed export formats (SPZ, SOG) to reduce file sizes
Supported Formats
Input Formats
| Type | Formats |
|---|---|
| Images | JPG, JPEG, PNG |
| Videos | MP4, MOV, MKV, AVI |
Output Formats
| Format | Description |
|---|---|
| PLY | Gaussian Splatting native format |
| SPZ | Scanniverse scene format (.spz; quantized) |
| Splats | Compressed Gaussian Splatting format (.splats; quantized, omits higher-order SH colors) |
| SOG | Losslessly compressed Gaussian Splatting format (.sog) |
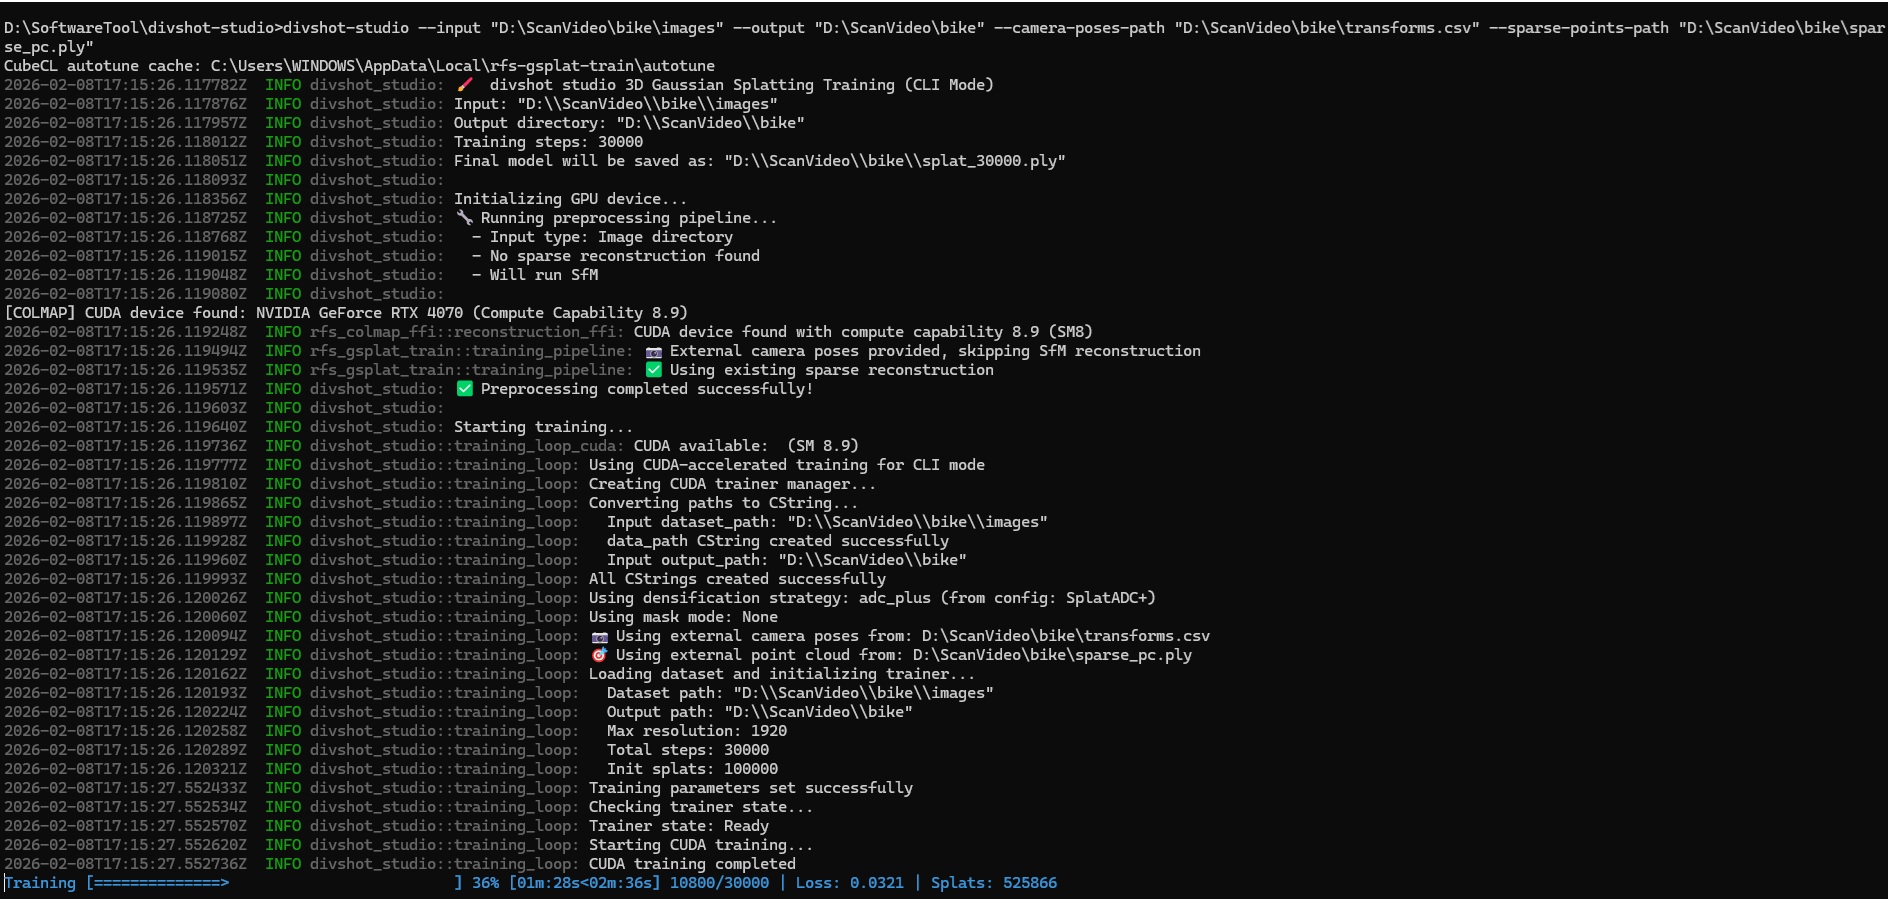
Command Line Interface
divshot includes a CLI for batch processing and automation.
Basic Commands
# Start reconstruction
divshot-studio --input ./images --output ./output

# Start reconstruction with pre-computed camera poses
divshot-studio --input ./images --output ./output --camera-poses-path "transforms.csv" --sparse-points-path "sparse_pc.ply"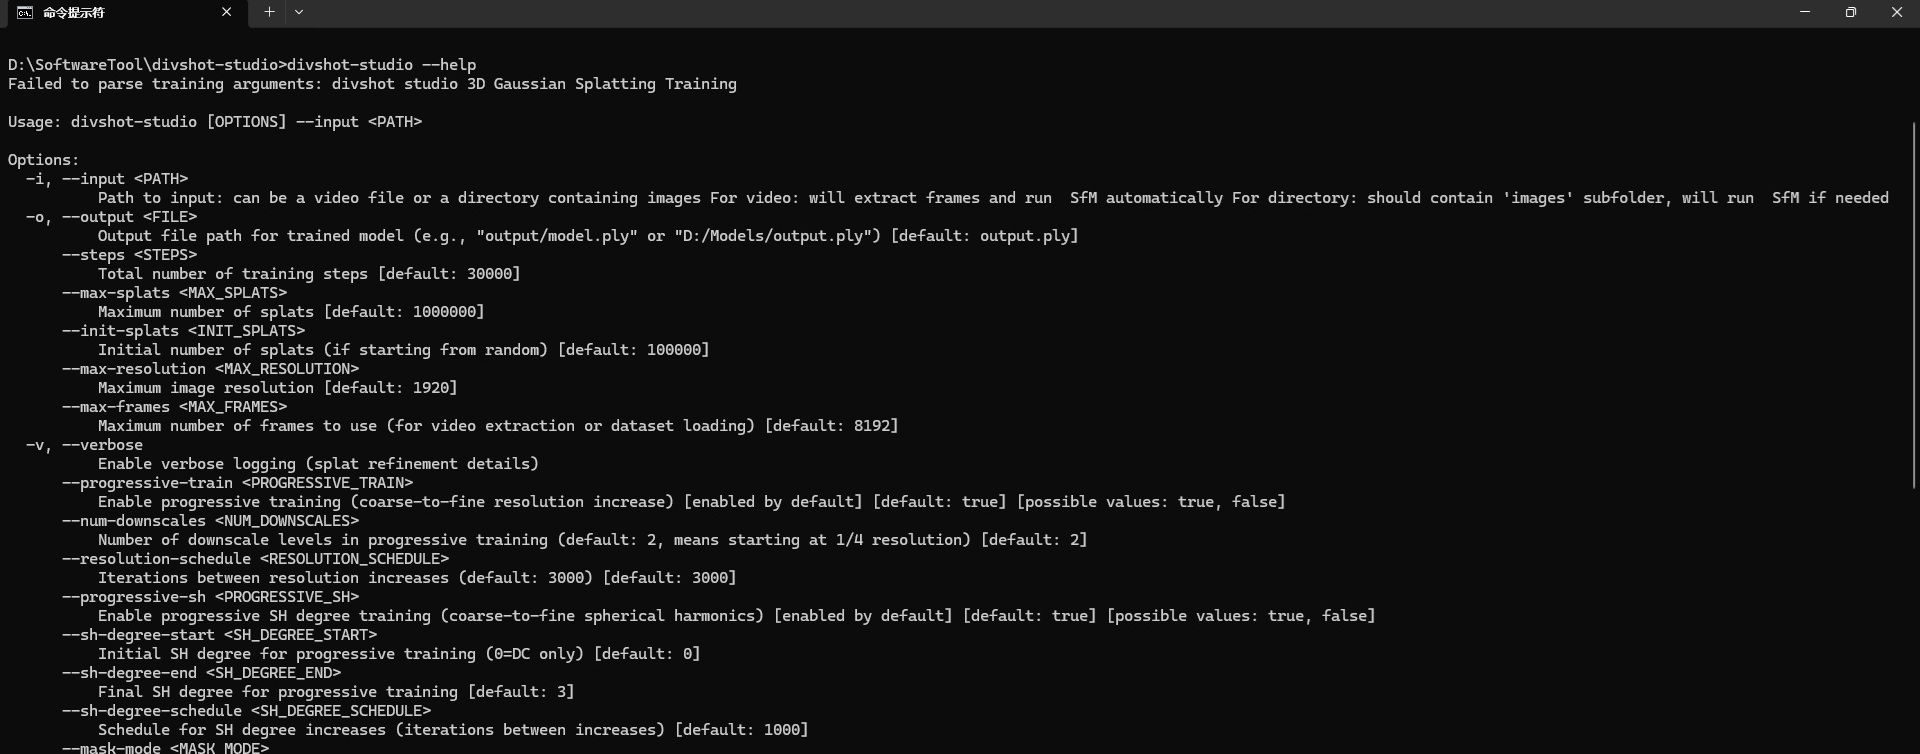
Common Options
--steps |
Number of training iterations (default: 30000) |
--max-resolution |
Maximum training resolution scale (4096) |
--max-splats |
Maximum number of splats (default: 3000000) |
Troubleshooting
Common Issues
CUDA out of memory error
Reduce training resolution or enable tiled rendering. Close other GPU applications and try again.
Camera pose estimation fails
Ensure sufficient image overlap (60-80%). Check for motion blur or inconsistent lighting in images.
Reconstruction has holes or artifacts
Add more images from missing angles. Increase training iterations or adjust densification parameters.
Slow training performance
Check GPU driver version. Ensure CUDA is properly configured. Reduce input image resolution.
Getting Help
For additional support, contact us at fhymyang@gmail.com